The Theory of Acoustic Guitar Top Relativity
The acoustic guitar top produces amazingly complex behavior when the strings are activated. At the most basic level, the top is an air pump. After all, sound is perceived moving air. The more air the top can move somewhat evenly across the tonal spectrum, the better the guitar will sound. Strings attached to the bridge tied or with pins are attempting to move the top in and out in a tonal range that is only required of pianos and violins, cellos, etc. So we are asking that top to perform an amazingly complex thing. And the top does not move the same in all areas. Some areas are moving a lot, some just a little. Some are responding to low or high frequencies more than others.
So what can we do to assist the top in this mission?
Compare the top and the associated back and sides to a speaker box. Speaker manufacturers discovered that the box back and sides can assist or detract from the ability of the speaker to reproduce the frequencies it is electro magnetically asked to reproduce. The key concept here is that if the enclosure is allowed to vibrate, those vibrations nullify or vitiate what the speaker cone wants to do. Note how early versions of the Fender Dual or Single Showman are extensively braced. My vintage single Showman speaker box has several 1 X 2 maple braces on the sides and back. My vintage Pioneer five speaker enclosure uses heavy back and side wood with side and back bracing. For best tone, the same should be true of the acoustic guitar box or body. Furthermore, I propose that people like vintage Brazilian and Indian rosewood guitars because those woods are denser and heavier than other species (especially mahogany) and therefore tend not to need side bracing. But additional side bracing helps regardless of wood species. Reducing unwanted vibration is the key.
The acoustic guitar box sides should be braced with 3/8 or 1/2 inch wide by 1/8 inch thick quarter sawn spruce strips glued perpendicular to the top and back. Solid rosewood braces rounded and tapered are even better. As an aside, I wish someone would explain to me why some manufacturers still use fabric tape on the inside box sides. This accomplishes nothing. For vintage guitar restorers like me, these cloth strips are a giant PITA. Many mahogany guitars with no side bracing are surprisingly flexible. They bend at the waist. So, 4 to 8 quarter sawn spruce braces reduce flexing significantly. In some cases, side braces will straighten warped mahogany side wood. Of far greater importance, side braces reduce unwanted vibration, thereby forcing the top to vibrate without vitiating vibrations from the side wood. The same is exactly true of the acoustic guitar back. Please note the substantial and beautifully formed back bracing in every USA made Martin, Taylor, Guild, etc. guitar.
Another, even more important improvement is additional top planking under the top and north of the sound hole. I have experimented with bracing on several acoustic guitar tops. One received no bracing above the sound hole at all. Another received only a single cross brace perpendicular to the top grain. A third received additional cross-grain top wood (3/32" to 1/8" thick) planking from neck block to the brace north of the sound hole. This structure produces the best tone results. By tone I mean improved volume, flat response, and most important, enhanced harmonic response on 5th, 7th and 12th frets, etc. Please see my article on harmonic tuning.
So why does extensively strengthening the upper bout work so well? What follows is my Theory of Acoustic Guitar Top Relativity. (I know, I know! I am not pretending to be Albert Einstein, but I do look like him. Can’t find a decent stylist anywhere.)
When the top is attempting to move air after the strings are strummed, the area around the bridge wants to move in or out generating sound waves. The area north of the sound hole also wants to move in or out in opposition to and relative to the movements of the top south of the south hole, thus canceling out what the strings and the bridge are trying to do. The top north of the sound hole is independent of the top south of the sound hole because of the sound hole. Martin guitar company, I think, discovered this years ago and installed what is now called the Popsicle brace in addition to the brace north of the sound hole. But they should have done more.
In my opinion, for optimum long term play action stability and best tone - assuming X-bracing - the top north of the sound hole should be planked cross grain from neck block to north of the brace near the sound hole. Planking in this way accomplishes two objectives: 1) preventing the neck block and therefore the neck from rotating towards the sound hole under string tension 2) preventing the top above the sound hole vibrations from interfering or vitiating the lower bout vibrations, thus forcing the bridge and the entire lower bout to do its job of producing sound waves consonant with the strummed or plucked strings.
Whew! That was a mouth full. Let me take a moment to untangle my vintage brain.
So what do I mean by "the top north of the sound hole should be planked cross grain from neck block to north of the brace near the sound hole"? I use spruce top wood "planking" to cover approximately 50% of the top wood from and right up against the neck block to a brace across the upper bout just above the sound hole. This is an improvement on traditional X-bracing patterns and replaces the Martin Popsicle brace. The grain runs perpendicular to the top grain. If properly fitted and glued, this results in noticeable tone improvement and a more solid play feel. Long term play action stability is also significantly improved.
The planking idea also applies to the new V-bracing pattern discovered by Taylor guitar company. And kudos to them for developing a new bracing pattern. Extend the V-braces from the tail block all the way to either side of the neck block. Add a cross brace 3/8" from the sound hole edge. Fill in the area between the neck block and the nearest brace with top wood planking. Also fill in the area between the brace nearest to the sound hole with a small strip of top wood. The additional top wood extends from V-brace to V-brace (side to side), but does not extend to the kerfing (liner blocks).
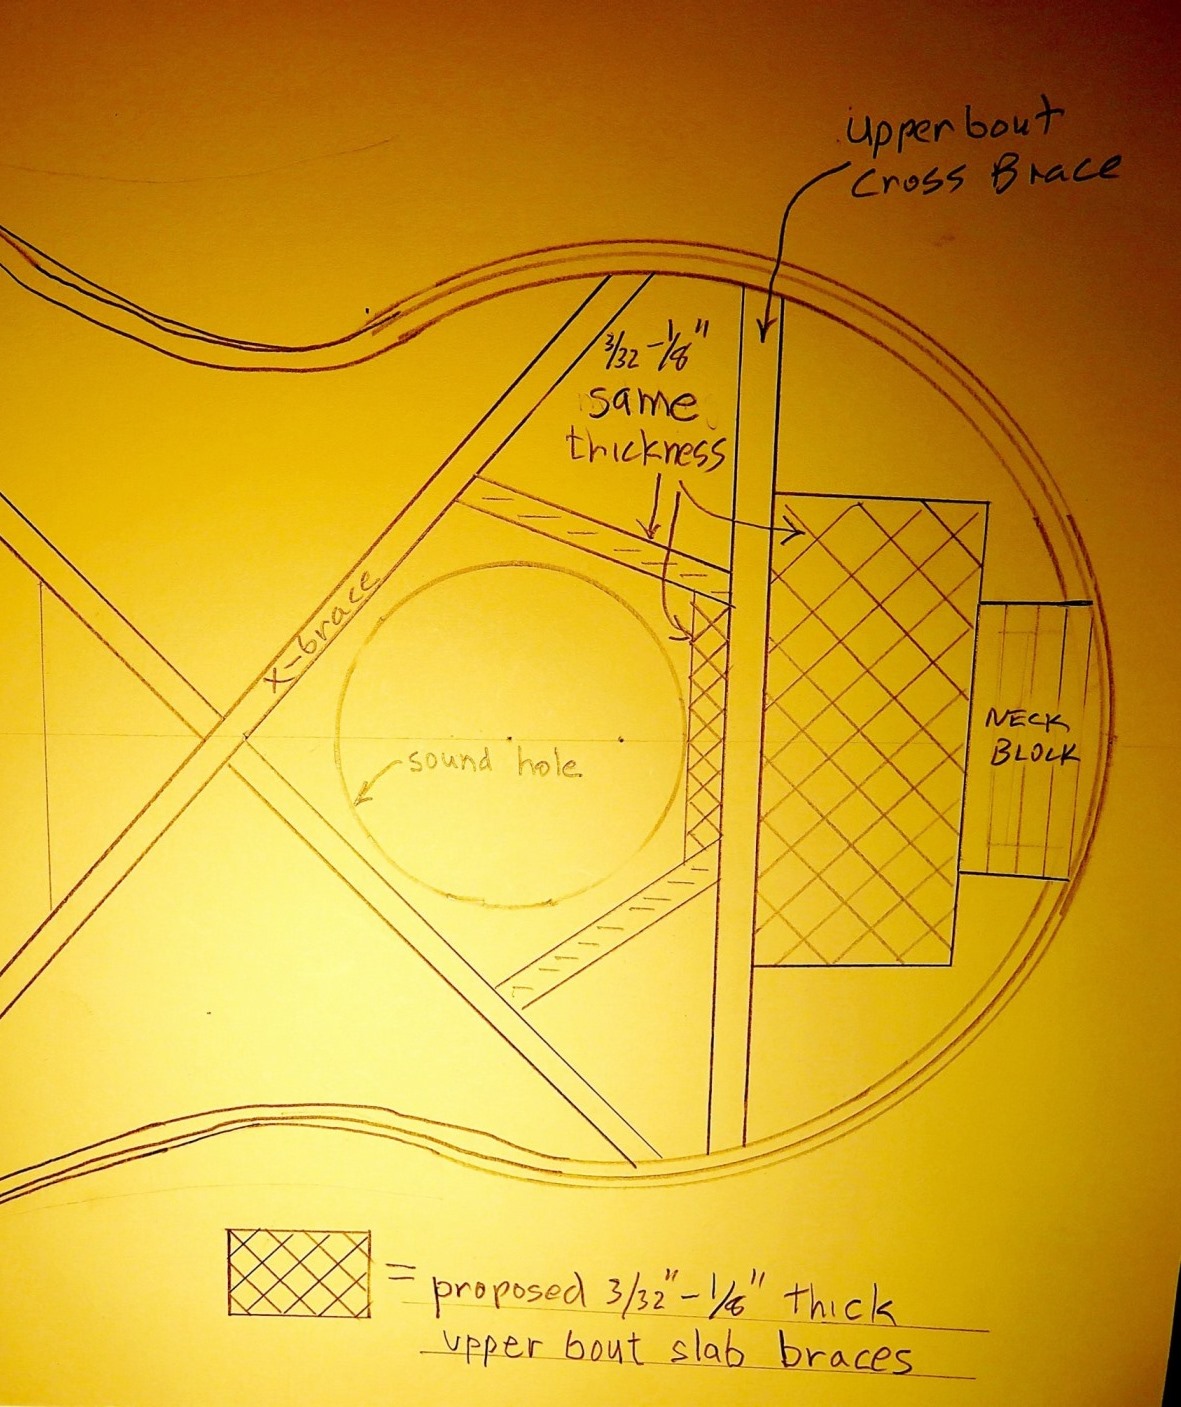
The diagram below shows my proposed upper bout bracing and planking pattern. The new block to brace plank is illustrated with hash marks.
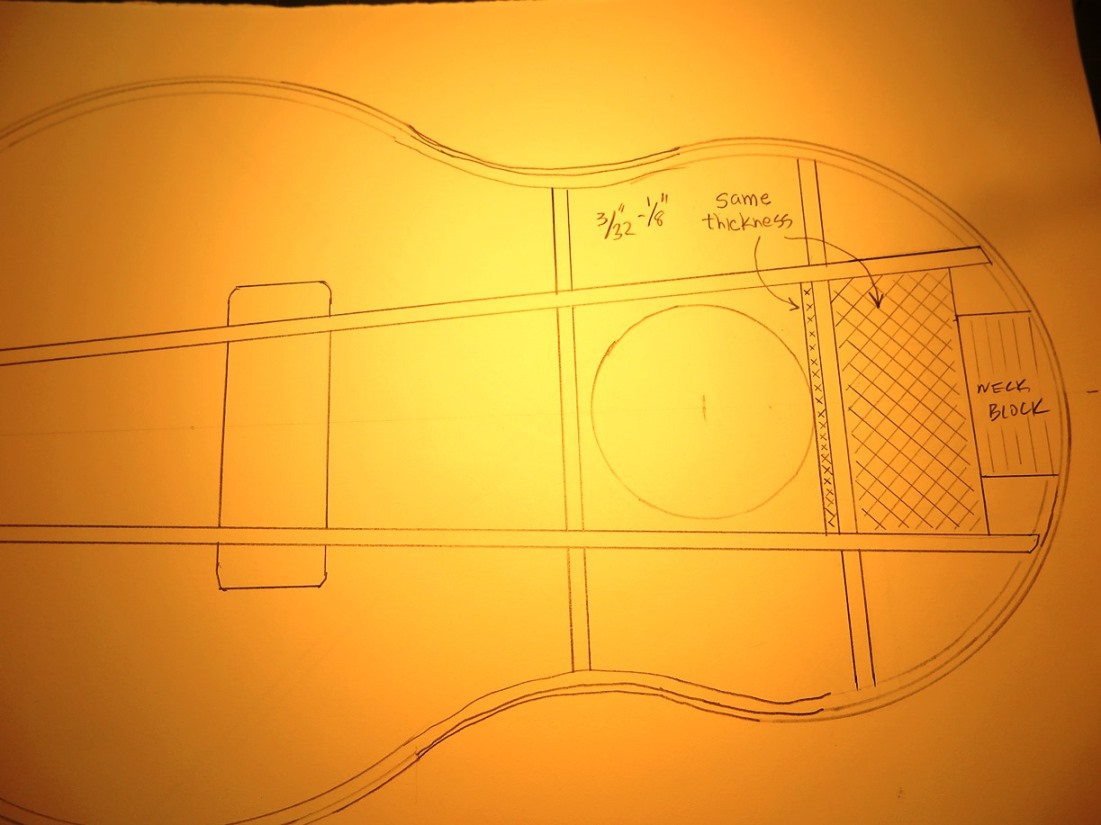
The diagram below shows my proposed improvement to V-bracing. Hash marks denote the added material.
I’d like to extend the thinking here a bit more. Some acoustic guitar manufacturers use the upper bout support structure shown in the image below. The theory here is preventing the neck block and neck from rotating towards the sound hole. In my opinion, this design has poor long term reliability and is much more subject to failure than other top bracing patterns.
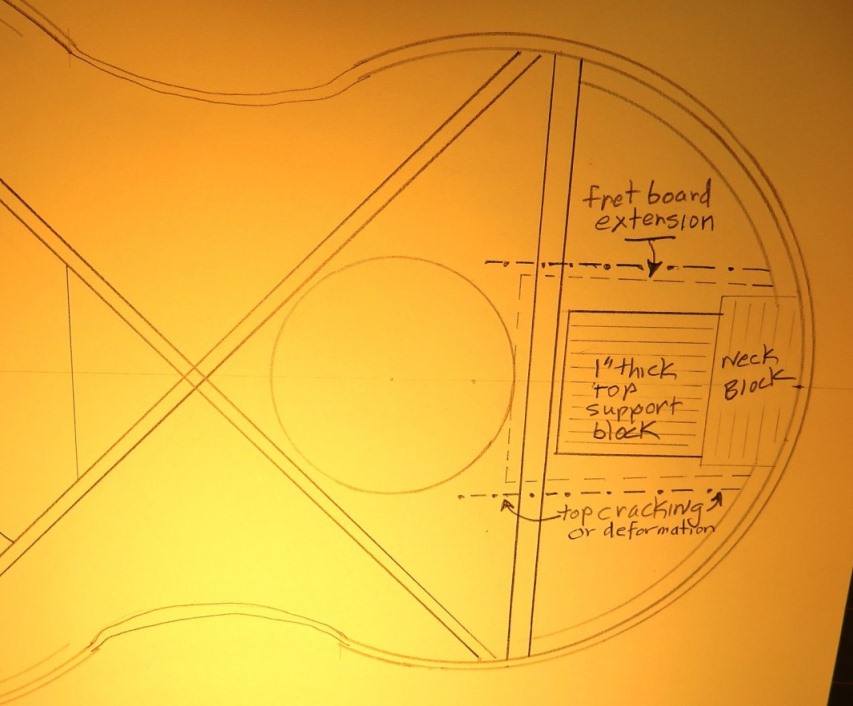
The problem is, the L-block structure relies entirely on the top wood annular growth ring strength. Proof in the pudding here is that a good number of these guitars have cracks or deformation along the fret board extension. This may well show in the top at some point. The Mossman guitars made in the 70s are a great example of this, great guitars though they are. Now, guitars with cross braced upper bout structures may also show cracks on one or both sides of the fret board extension, but these guitars were subjected to unusually high pressures forcing the neck to collapse into the top. For example, someone sat on the guitar, or someone held the guitar cross wise while walking through a door, or some sort of spousal abuse was involved. (I have seen the latter in progress in person.)
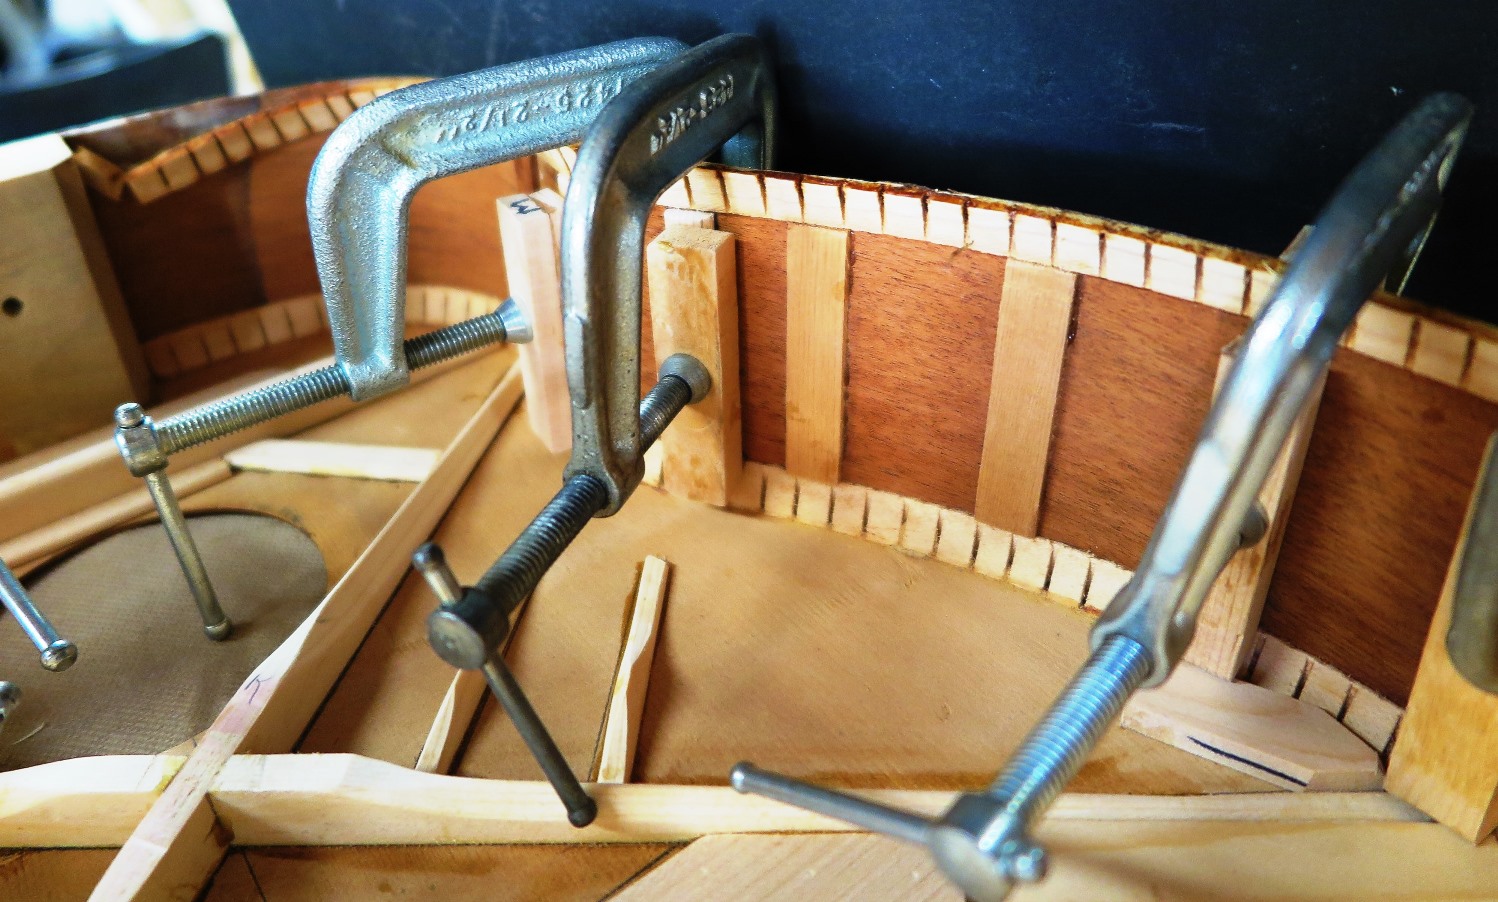
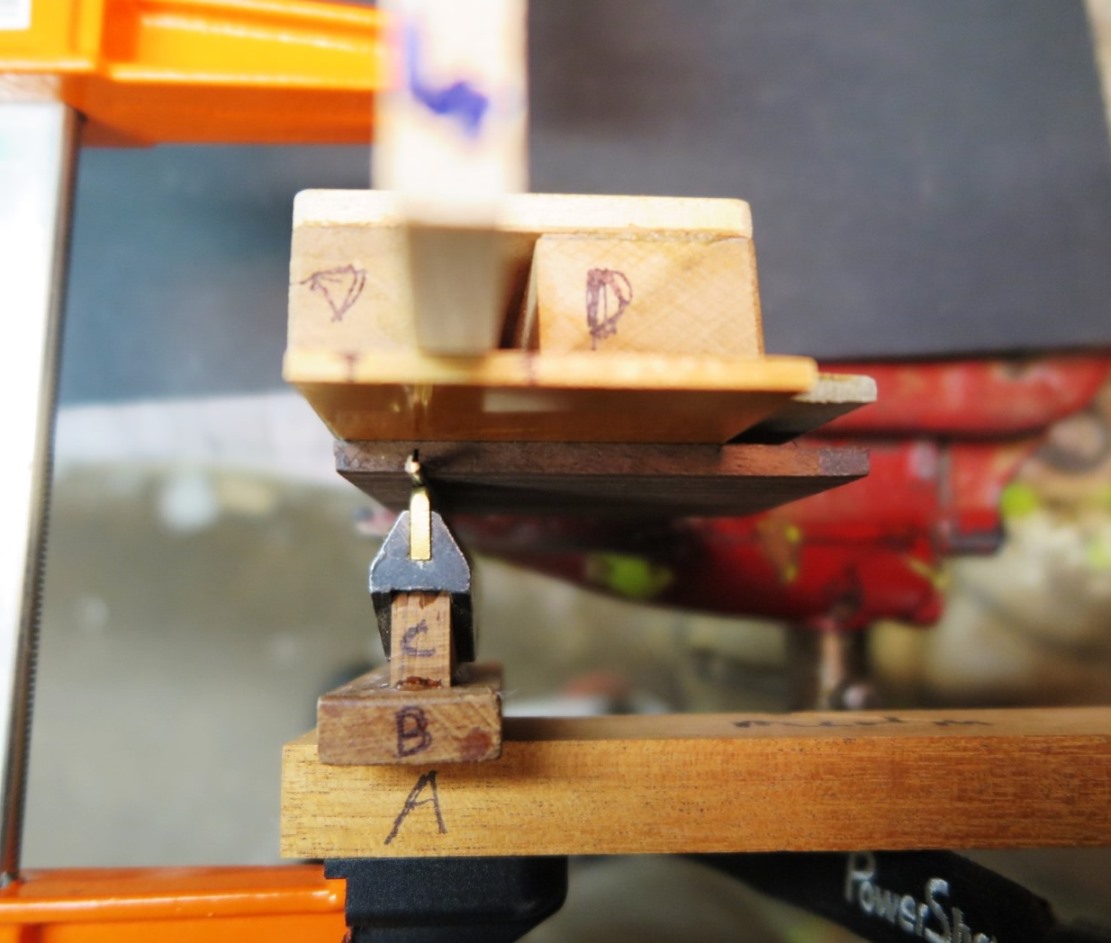
There is yet a third benefit to adding upper bout planking: Easier fret clamping on the fret board extension. The additional planking provides a level surface for fret clamping with a temporary clamping block and caul system. The image below is a cut-away, so to speak, of a fret clamping setup relying on the added upper bout planks described above. Note the letters on the bits of wood. The planks provide a level surface for a U-shaped clamp block (part-D). Part-A is a bar long enough to also be clamped at the nut end of the neck at the same level as part-B. This bar keeps Part-B from rocking as the fret is clamped. Part-B and part-C are epoxied together. Rosewood part-C is inserted into part of a Stewmac 4266 Jaws2 Fret Press. I think you can still buy just the black metal part. Inserted into the black metal caul holder is a fret press caul made of brass (1/8inch thick). Below the brass caul is a fret. You can only see the end of the fret. The brass caul is pressing the fret into a rosewood fret board extension. Part-D is a U-shaped clamp block which is two-side sticky taped to the underside of our added top planks. You can barely see the "T" marks on the top edge. The sound hole is to the right of black and brass caul assembly. You can see a 7/16 inch wide brace sticking out of the clamp block. The end towards you is marked with a blue number 5. Unfortunately, I could not show the added upper bout planking in this image. Because of my very unstable cutaway mock-up, the whole thing wants to fall to pieces on the floor. Also, please note that the "F" clamp is upside down. The handle (threaded) side would protrude out of the sound hole. The great thing about adding planking to the upper bout is that it provides a very stable, strong and level surface for the clamp block (Part-D). You can clamp the heck out of those recalcitrant fret board extension frets without risk of breaking the top. Man, I need to work on my mock-up building skills, not to mention my horrible photography skills.
Ongoing side bracing installation image below: